index
index index
RV Accumulators


There are two types of consumer Accumulators:
BBALLBLU.GIF, 139B The Open Air Accumulator
BBALLBLU.GIF, 139B The Bladder Accumulator
They both have problems.


The Bladder type has a rubber diaphragm that has a limited lifetime, and will turn into an OpenAir type in time. The OpenAir has a tire valve at the top which is used to repressureize the Accumulator. This type of Accumulator can not be used in an RV because no manufacturer wants the liability of a leak. This type of valve very slowly leaks air, and requires more frequent recharging. And when the water reaches the valve, the valve will leak water. Damages would be in the thousands of dollars for each occurrence.


BBALLBLU.GIF, 139B But I have a third type:
Accum-Top30.jpg, 80kB
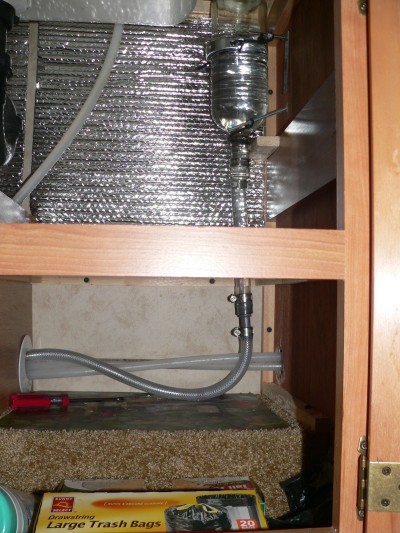
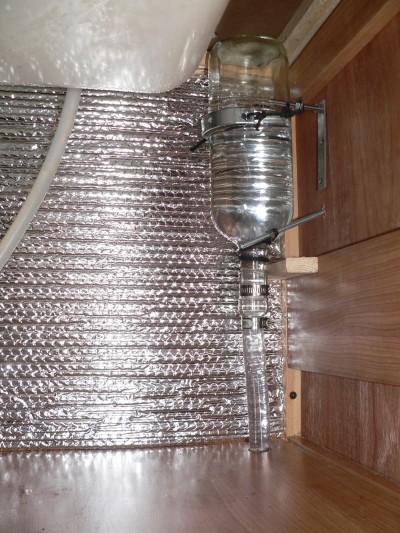
Here is my modified Open Air accumulator. A simple wine bottle, mounted upside down. This one is mounted under the sink cabinet.


In time the bladders leak and turn into Open Air Accumulators, and you never know which it is. And none of the time, can you see their status. You can not tell how well they are working.

And the store bought Open Air Accumulators are worse. To an extent, they are continually waterlogged, and you never know how waterlogged. You never know the percentage of air to water.

But I do!
I can see inside mine! I feel that I am the only RVer in the whole world that has this type. At the time of this writing 2019, I have been running two homemade accumulators for 9 years. I have had absolutely no problems. Love them!
Before I get into it, here is a little background...


Reasons for an Accumulator:

BBALLBLU.GIF, 139B A pulse pressure buffer.
On demand water pumps produce high pressure pulses. The continual vibration and stress will cause connections to leak. Perhaps only a drop or two, but still cause hidden mold and rot.

Or catastrophic total failure! Here is an example of what can happen:
In the early days of fighter jet development, a new F-14 Tomcat had fractured it's hydraulic lines from vibration fatigue. Fatigue was from a piston driven hydraulic pump producing 300 lb pulses, much like an RV but on a smaller scale. Before this time, Accumulators had not been invented neither for fighters or RVs. Totally because of this, The F-14 prototype crashed, and was lost.

Here is another example:
At the very beginning of nuclear submarines, they are absolutely essential for the sub to operate. Steam generation produces violent bursts of pressure. Failed Accumulators, or their improper operation, have totally disabled nuclear submarines. These are secrets, not talked about.

I thought of yet another example. Involving steem pulses instead of pumping pulses:
A contributing factor in the Three Mile nuclear accident was the improper use of the Accumulator by the operators.

BBALLBLU.GIF, 139B Water reserve
In the quiet of the night, you can use the bathroom without the pump coming on. The bigger the Accumulator, the more water reserve. There are no water reserves with commercial small bladder types. But not so with residental tanks and accumulators of 100 years ago. My dad had at least 30 gallons of water reserve out at the pump house. And talk about going for hours without the pump comming on... You could pull gallons and gallons of water, without the pump coming on. Now too, my RV has the comforts of home!

BBALLBLU.GIF, 139B Pump longevity
The accumulator makes life easer for the pump.
And the pump does not ever pump against a hard stop as is for a faucet turned off.
This bad practice is called "water on demand".
And a lot of RVs come direct from the factory with this defect (or oversight).

BBALLBLU.GIF, 139B Adjustable pressure:
Also, you can make life easier for the pump by buying an adjustable Pressure Regulator. Any commercial Regulator will have a Cut-In pressure, and a Cut-Out pressure.
You can have a lesser pressure in your RV.
Most RVs have no way to adjust pressure.
BBALLBLU.GIF, 139B Quietness
You can brush your teeth in quietness. A simple thing like this means a lot to me. You can hear the crickets instead of camper sounds.
RULERMAR.GIF, 1 kB
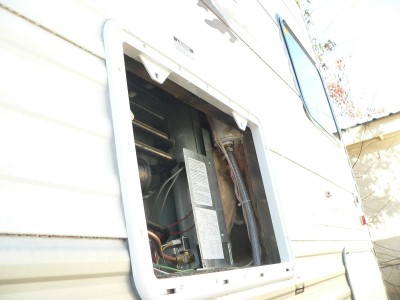
Accum-OutsidePannel-Refreg.jpg, 25kB
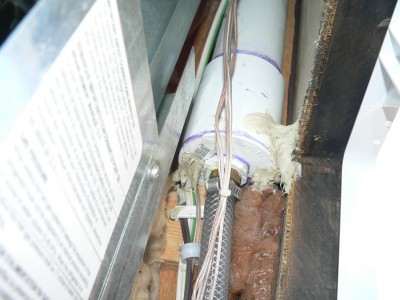
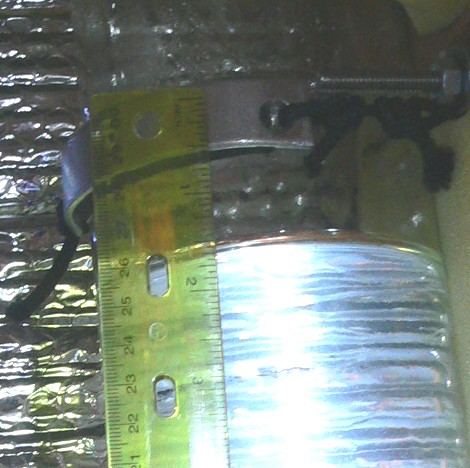
My Main Accumulator is a 4 ft piece of 2.5 inch PVC pipe. I easily installed it vertically, behind the refrigerator, in the refrigerator vent area. The perfect place: vertical, out of the way, unused space, and high up. You want it as high as possible. The top of this one goes to the roof. The top of the refrigerator hold gets warm, but no where close to melting PVC or ABS.

You can see the bottom of it in the picture at the upper right corner. I have cemented the end cap really good; sealing air is different than just sealing for water. The integrity of this top seal can not be overimphasized. I would not put a tire valve there unless you intend to operate an air compressor all the time. An RV is not the place for waisted effort...
Such a PVC pipe is about 3.8 Liters or 235 cubic inches. Most commercial bladders are about 620mL or 37.8 Cubic inches. So I have a better accumulator than any "store bought". I put this first accumulator in the RV in before 2010. When faucets are on, the pump no longer "hammers" away. And I can use the bathroom in peace, without that damn pump coming on.
Accum-BottomS.jpg, 31kB Looking vertically up...
The connector ends of the original hoses were not rated above 50 lbs pressure, and I have had several unexpected leaks; some slight and some catastrophic. So much as even one drop of water is intolerable, and can cause thousands of dollars in damage!

I use all 1/2 inch reinforced vinal hoses with barbed fittings and gear clamps. Work good. The "hard" PEX lines have been ok and have not leaked. And it is just as well, because the ends are expensive and difficult to work with.
I have had no trouble with the vinal, and it is easy to work with.
For my accumulator I like white PVC better than black ABS because the cementing is bullet proof. There can not be even the slightest of an air leak. And still with a non-bladder and no air leaks, the reservor will have to be occasionally recharged. For years, I have gotten most of it by opening the drain lines under the trailer, and it has been just "OK".

I have found a neat way to do this without placing a bleeder valve on top. Disconnect down stream of the mouth of the bottle. Snake a very small diameter hose through the lines and up into the bottle. The effect is the same as placing a tube into an "inverted" lake. Lake methane gas, air will explode up through the tube. In this case, air will suck in through the small tube, and water will pour out around it. Well... It is not too neat. More of a physics lesson. This is is turning into too much work: you have to disconnect a line somewhere.

I installed Tees and a valves immediatly near and below the accumulators. This works good, and gets it all. 100%!
Limnic-Eruption.jpg, 6.6kB

Absorbed gasses...
Pressure in the accumulator, or pressure deep at the bottom of Lake Limic, causes the weight of water to hold more gasses. My pressure is between 20lbs and 30lbs, and eventually the air in the top of the accumulator will be absorbed in the water and "go away". In this picture, pressure at the bottom of Lake Limic is reduced by an "Overturn", and a huge eruption of CO2 gas is liberated out of the water. Clearly, even with no air leaks in the accumulator, you will naturally loose air. I am being overly dramatic, your accumulator works differently, and is not going to overturn. At least not like this.


The accumulator eventually becomes "water logged". The trapped air is absorbed and the accumulator does not function well. The needle on the pressure gauge "vibrates", pressure builds faster, and the target pressure overshoots and undershoots. For me it is about every three months, and I try to not let it get this far.
Recharging is easy...
Disable the pump, and just open any valve that is lower than the bottom of the accumulator. After the water is emptied, air will begin to slowly gurgle up into the accumulator. The bathtub faucet works for me, but you may have to use the drains under the trailer. This method is easy, but I can not get all the water out, manely from the glass one. I had to install valves immediatly under each accumulator. That guarantees 100% recharging.

Besides higher pressure ratings, another advantage of throwing away of the stock hoses is that now you can see what is going on and you can see the air bubbles rising into the accumulator. I like to "see" stuff...
Pex is great, but you can not see the air bubbles of the recharging process.

BANASTAR.gif, 1.5kB Now faith is confidence in what we hope for and assurance about what we do not see.
This is what the ancients were commended for.
By faith we understand that the universe was formed at God's command, so that what is seen was not made out of what was visible.

Hebrews 11
I am an Engineer of over 40 years.
Show me!
Give me evidence. "Give me a sign."


RULERMAR.GIF, 1 kB
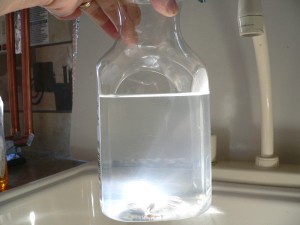
WineBottle.jpg, 35kB
A Wine Bottle Accumulator: "Seeing things"...
Which leads me to my second accumulator. This accumulator is more of a "viewing" accumulator.

My main accumulator, which is mounted in the refrigerator hold, has no sight-glass. It is just PVC pipe, and I can not see inside. And sure, I could have installed a section of clear vinal hose along side the PVC, but I did not think about it then. If I had thought about it, I could see how much air was inside. Now the cement is dried. It is finished, and can't go back. And besides... I have no confidence that I could tap into PVC with an air tight connection.

I did not particularly like the contents of the bottle, and I gave it away without much of a problem. The bottle is a 1.5 liter, or about 91 cubic inches. A 1.5 liter wine bottle is over twice the volume of a commercial accumulator. I dislike the taste of alcohol. But if I tell my donor people about this, then they will stop giving me wine bottles.
WineBottleNeck.jpg, 17kB
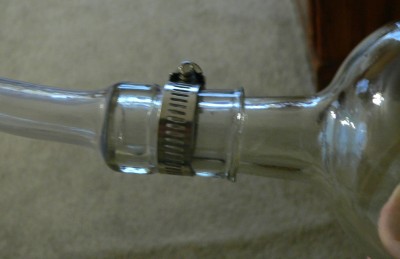
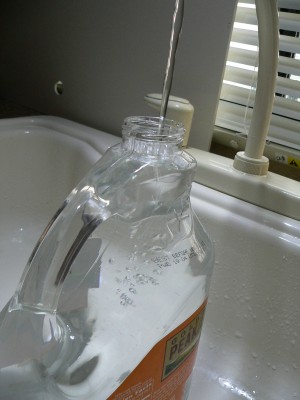
The neck needs to be long and unincumbered with things like a finger hold as found on an apple cider jug. I have seen other wine bottles even bigger than this.
The mouth is close to 1 inch across. But I had to use 3/4 inch (inside, ID) Vinal hose. Take the hose end above a burner on the stove. Gentle heat untill soft. Once you work the hose end over the neck, and after the vinal cools, you can put a clamp on it for esthetics. Actually, esthetics does not work. As tight as the vinal seemed, it will probably leak without a clamp!

I like the setting of just under 30 lbs: It is perfectly two atmospheres, or 29.392 PSI, and 33 ft of head. And it is well below the 50 lbs rated pressure of most RV hose connectors.

Bursting pressure for a wine bottle is about 400 psi, if the glass has no thin spots, nor surface defects, nor side pressure from my mounting hardware.

The real issue is the compromising of the vinyl thickness by stretching 3.4 inch vinyl to 1 inch proportions around the neck. It has been many years with no problems.
I went over to Michaels, a bead and "pretty-thing" store. I bought some floating beads. I placed the beads in the bottle before all the hook ups. I thought the beads would float on the water line inside the bottle. Make sure the beads are too big to pass through the connections. You do not want them to leave the bottle when you purge the system. I noticed the beads sink further down when under pressure; another exersize in physics. I hope they do not implode or break. The pieces would be free to migrate into a valve or something. Perhaps I should not have done this. And the beads don't really help in seeing the water line anyway. It is yet another one of my lame ideas. I had no business in that store anyway.

Update:
After only one day the balls began to break. They were not made of glass. I could see parts had fallen down inside the clear vinal hoses. The pieces were in my system, just as I had feared. Everything had to be disassembled. A needless, time consuming process. At every step of the way I kept reiterating under my breath: "stupid idea", "stupid idea" . After all lines were back in place, I reapplied pressure, and observed yet another piece that I had not seen before. It must have been deeper in the lines. I do not know where it came from. Bad news...
The piece was slowly moving toward the bottle. I went ahead and pumped to 30 lbs. The nearest exit was the cold water tap on the kitchen sink. I opened the tap as far as it would go. With full force the water came out, and I could see the piece was traveling in the lines and soon shot out the tap into the sink. It went pass the valve and was lying in the bottom of the sink. Lucky! I won't do that again!


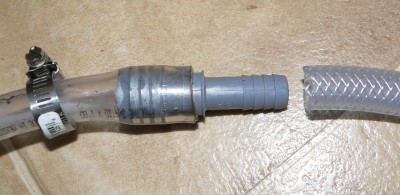
Accum-Barb34to12.jpg, 26kB
Connect the bottle's 3/4 hose (on the left) to the standard 1/2 vinal hose (on the right) with a barb to barb adaptor. I use 1/2 inch hose all over the place, and I must get to it as soon and directly as possible.


Accum-Cabinet.jpg, 72kB
Here is the accumulator installed in a cabinet of choice. I chose under the kitchen sink. There is red nut driver laying in the bottom section. Nut drivers are the only way to adjust gear clamps in a manner that allows good control. And vinal is soft and slowly flows, so check it again in a month or two. What is absolutely, for sure, tight today may not be tight in a month or two.


Accum-Top30.jpg, 80kB
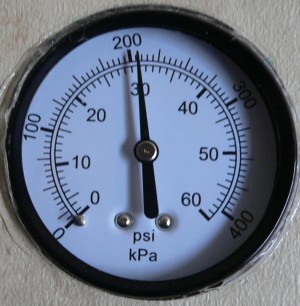
Here the water level is at 30 lbs, which reads two atmospheres above standard earth pressure on the pressure gauge.
And it is exactly at the top of the brace.
I also have marks at 20 lbs and 10 lbs. But the marks are only valid at initial charge.

Note that the wine bottle is about 2/3 water, and about 1/3 air at the max pressure setting of two atmospheres.


Eq-PV-Real.gif, 8.3kB
The amount of air in the wine bottle is starting out at Atmospheric pressure.
This reads "zero" on the gauge. The bottle is empty, its all air. And I do not concider the weight of water pulling a vacume, as it is minor.
Any gauge reads the difference of pressure between outside atmospheric pressure and the hose pressure of interest. But the pressure is really 14.7 lbs per square inch in Absolute earth pressure (Standard sea level presure, and Temperature).

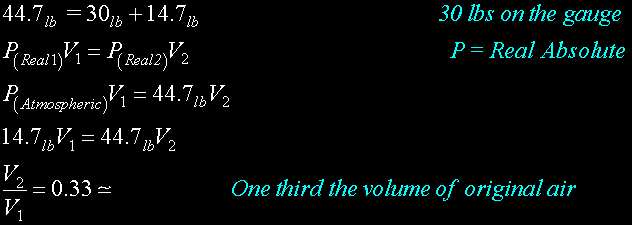
Eq-PV-30lbs.gif, 8.2kB
For example:
For my setting...
The volume of air at the top in the wine bottle will always be one third of the "zero" gauge pressure.
I have some water in the hoses, so that in the beginning, the water level is at the bottom of the bottle. The gauge reads zero when the water level is at the bottom of the bottle. I then increase pressure...

In looking at my equations, I first point out that there are two pressures:
BBALLBLU.GIF, 139B The pressure INDICATED on the gauge,
BBALLGRN.GIF, 138B and the ABSOLUTE pressure.

Consider a gauge pressure of 30lbs. This is really 44lbs Absolute. And I have a piece of tape on the bottle to mark this level of water.

The air in the bottle is compressible and follows the "PV" equation. The air volume becomes less and less as the pressure increases

The water portion is not compressible and indicates the starting point reference, which was the Standard Atmospheric Pressure (STP).
The WaterLine rises as the air is compressed.

Let V2 represent the volume of the air. It is a variable. And I arbitrarily put the pressure at 44lbs, a constant. And this is the right side of the equation. ...The air side.

The left side is the water side, where the pressure is the Reference; It is the Atmospheric Pressure.
The water volume must increase to balance the right side of the equation.
As the pressure increases the water volume increases, directly opposite that of the air.

In my equation, the two pressures numerically resolve into a ratio, representing the two volumes.
And with a ruler, it measures about right.

Anyway...

The accumulator's buffering action will be less and less with time.
Although, I have seen this happen in Dad's non bladder water tank "out at the well".
Dad's pump would only run for 10 seconds instead of a minute. It would cycle on and off too fast.
Dad showed me how easy it was to drain the tank. During the process, you could hear the gurgling and gulping when he shut the power off and opened the valve at the bottom of the tank.


Accums-OneGallon.jpg, 25kB The accumulators, the glass bottle and the ABS pipe, hold one gallon of water. To get this measurement, have the pump deliver its normal 30 lbs, and after it stops turn the power off so that the pump will not automatically come on. The water level will be approximately 2/3 full in the glass accumulator and approximately 2/3 full in the pipe accumulator. Use a tap at a sink to fill a container, and see how munch water is stored under pressure. Fill the container untill no more water comes out of the tap. At the same time the gauge will read zero.
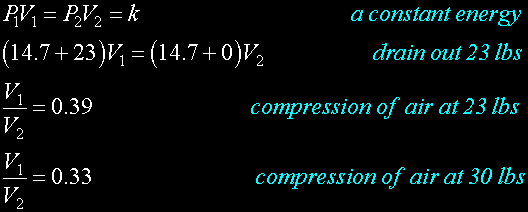
My big PVC pipe accumulator holds 2/3 of 3.8 Liters.
And my glass "see-in" accumulator holds 2/3 of 1.5 Liters.
Both together figures about 3.53 liters.
I should get a little less than a gallon, but I fill up a whole gallon. I guess there is a couple of pints in the water lines.

Perhaps, from time to time, God gives life a little extra abundance. It goes to show you that there are gifts that are unexpected and free. It is even true for a strict scientific engineer. When you are thankful for every breath, you will get some free ones. I also have found that when your body is in pain, you will get some free ones. Generosity has a new meaning in such circumstances. And my water bottle proves it; Right before your eyes.


Eq-PV-23lbs.gif, 7.9kB In practice for these initial settings, the pump cycles between 30 lbs and 23 lbs.
How much water is this?
Eq-PV-Diff.gif, 3.8kB So you get a gallon available and completely drained, and only .3 liter under pressure.
Huge difference! The two pressure choices of Cut-In and Cut-Out seems disappointing.

Of course, you could always reduce the cut-in pressure on the pressure switch. Yes, you would have more water. But you would have little pressure on the low end. And that pressure would have a wider swing and less pressure consistency. One option is to build bigger accumulators. This is an RV; that option is out. But, what the heck, that is exactly what I did... You can still take a shower at lower pressure, and everything still works fine.


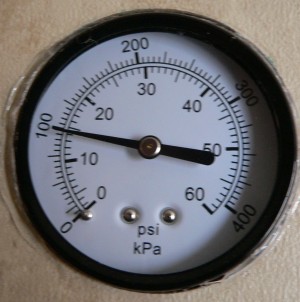
Accum-CutIn1Atm-Meter.jpg, 23kB Accum-CutOut2Atms.jpg, 28kB
I lowered the cut-In pressure to one atmosphere, 1.0 Atm, 15lbs/sqin, and the cut-out to aprox 2 atmospheres.


Eq-PV-15lbs.gif, 7.8kB Eq-PV-Diff1.gif, 3.9kB
There is something esthetically pleasing about 2 atmospheres and 1 atmospheres, as set points. So this is where I set my water system. Much more water can be had with a lower Cut-In pressure. And in looking up at the clouds and atmosphere, there is something pretty about it. If you have a little Aspergers, the Atmosphere graduations on any meter look better than the pound graduations, for some strange reason.

Look at how much more water I am getting... It is a big difference: almost a liter of water now! ...Just by adjusting the water pressure lower, and to something stupid like "atmospheres".
Pressure and Volume are inverse parameters of a constant product. One goes up, the other down. Pressure*Volume, or PV, is "Energy" by all definitions.
The Units for the Standard definition is Pascals for Pressure, and cubic Meters for Volume.
It is Energy, or Joules.
But you could, just as easily, have Atmospheres for Pressure, and liters for Volume.
It is still Energy, or Joules.
It makes no difference, except for a "100" conversion factor.

This Energy is "macroscopic". To look at microscopic energy, look at the individual molecules, and the Energy is nRT. Where, basically, the energy is the number of moles times the energy of each mole. It is all the little 1/2mv2's running around. Macroscopic PV is the same as microscopic nRT. Both energy, and both equal with no conversion.

For me, out here in the RV, I seem to have wine bottles in units of "liters" and Pressure in units of Atmospheres.
For example: If my bottle is a one liter empty bottle,
left open to the atmosphere, which is one atmosphere;
Then the air has about 100 Joules inside. That is kinda by definition.
Actually it does matter what the Energy is. What is important is that the Energy does not change with the PV product.
You could say that PV=K. It is a constant if you wait a lot, and keep the temperature the same. If the internal temperature of the gas is the same, necessarily the internal energy PV is always the same. If you do not wait, and have the RV pump instantly to pressure, which it can not do, then you have an adiabatic process where internal heat feeds back on itself and creates complicated equations. Let your pump work slowly to avoid this.

That is one of the reasons for an RV Accumulator that I forgot to mention! I mentioned Reserve Water. I forgot to mention Reserve Pressure. A nice Accumulator is both a reservoir of water, and also a reservoir of pressure.


Accum-175Down.jpg, 59kB
All accumulators will read the same in the RV no matter where they are located. Well, that is not quite true:
If you mount an Accumulator high on a wall, it will experience less pressure than what the pressure meter sees, mounted lower. For example, my solar hot water panel mounted up on the roof, requires about 4 extra pounds of head pressure to operate.

Anyway...
But for this Accumulator, 32 lbs is exactly at the top of the brace on this glass accumulator.
And 15 lbs is at the mark, which is about 5 inches up from the bottom, and 5 inches down from the top.
Or, about 1.6 inches down from the 32 lbs mark.
The bottle is about 10 inches long.
The whole body portion of the bottle is about 10 inches long. So 1.6/10 is 0.16;
great agreement with the calculation from above at 0.167.

Accum-DiffJug.jpg, 14kB
Turned on the sink faucet, and drained down from 32 lbs to 15 lbs on the gauge. I collected the water in this 1.75 liter jug. And again, I have been given a little more than expected. I would say this is at least a liter. I was only expecting 0.89 liters.

God pores out goodness with a little extra measure. At least for water.


AccumGrnLed20191122_12.jpg, 69kB Just making things prettier...
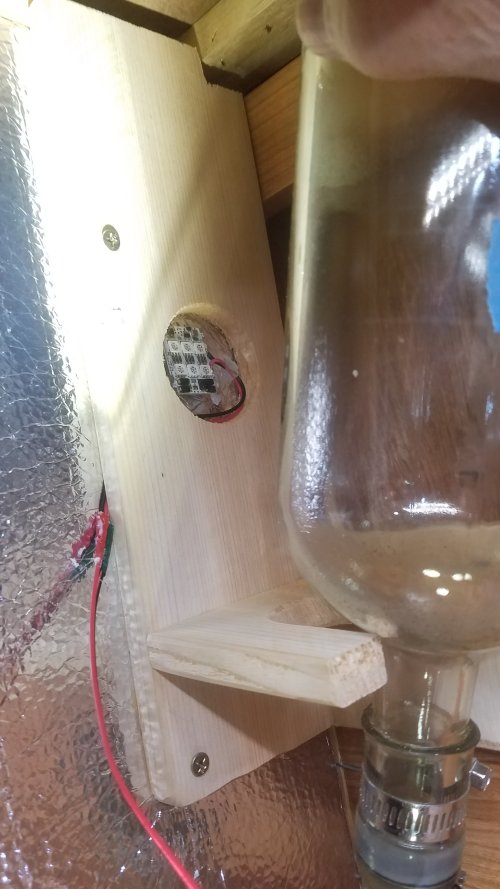
Created a different cradle for the wine bottle Accumulator.
And cut a hole to fit a green LED in behind the bottle.


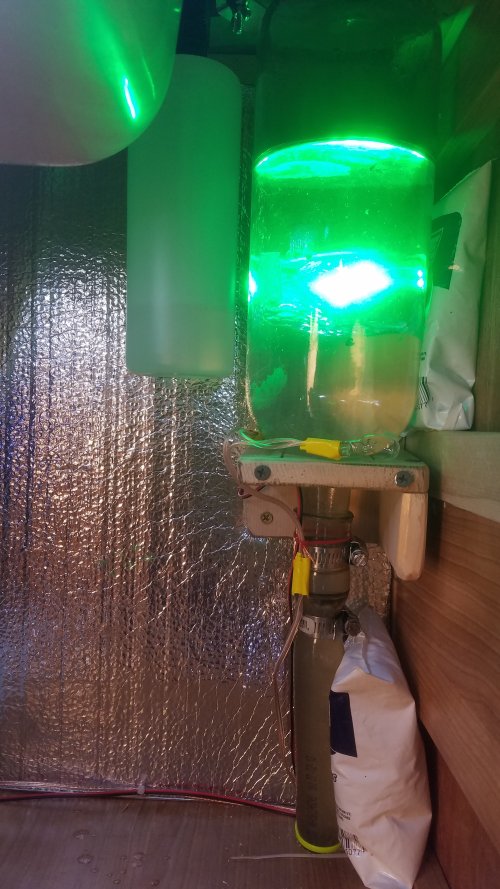
AccumGrnLED20191122.jpg, 95kB Reinstalled the soap dispenser; the round cylinder thing to the left of the bottle.
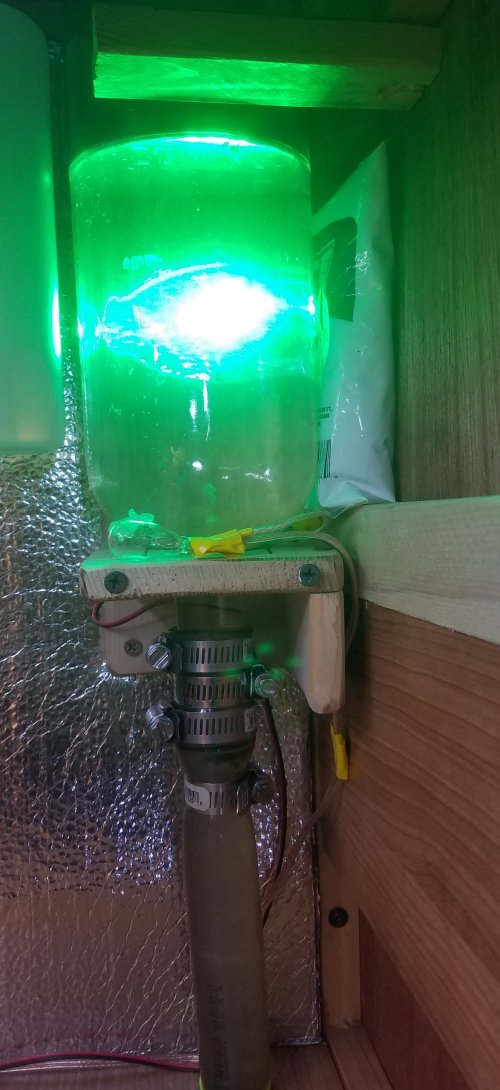
Wow, the intire bottle lights up "green". You can see the reflection of the top of the water. The level and pressure is exactly 2 bars, atmospheres.
I have placed a couple of freezer packs to buy more time with thermal inertia if freezing.
There are two incandescent bulbs on top of the wood base that come on at 33 degrees for heating.


AccumGrn20191125_130215.jpg, 89kB Added a couple of clamps...


RULERYEL.GIF, 4.2kB


AccumView20191122_131829.jpg, 103kB Here I am beginning to assemble a viewing accumulator. ...I guess that is what it could be called.
No one has built one of these before; at least not in an RV. I guess I am the first with this too.

Perhaps this is a good place for a disclaimer. I feel safe with a glass bottle. Although, I had one explode on me when I built a homemade Cloud Champer in the 8th grade. I am confident from many years, that pressurized glass is safe. At least from pressure, not from banging around in a banging around RV. But I do not feel as confident with unknown construction that no one has ever done before. Enough said...

The main part is a 2 foot section of vinyl. It is 1.25 inches inside diameter. It is a viewing tube. I have never tried this before. The part that is experimental is the top seal. It must be air tight, not just water tight. I applied liberal amounts of silicon past to the ridges of the plug on top. This may simulate "water" tight for an air connection. I am going to try to fool it.


An artist's only concern is to shoot for some kind of perfection, and on his own terms, not anyone else's.
J. D. Salinger
This whole apparatus looks a little goofy. Only a guy would have this in an RV. And only an engineer would even value it, whether in an RV or not. And it is a good thing that I am not an interior decorator; there is probably a law against it.


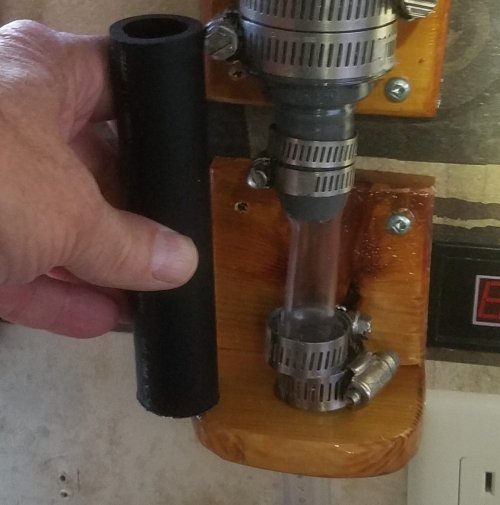
AccumViewBlack20191122_15.jpg, 37kB But before I could apply full pressure, the bottom connection began to leak. This connection was dubious from the start. I had to get down to a 1/2 inch ID from 1.25 ID. No one makes such an adaptor. The best that can be done is to adapt 1.25 down to 3/4 ID. And that I did. So, I thought I would warm 1/2 clear vinyl, non reinforced, and then force it over the 3/4. It was easy to do. And it does not leak until hose clamps are tightened. The vinyl is so thin that a hose clamp pinches the vinyl. It does not leak without the clamps, but of course an unsecured connection can not be trusted. I even tried more narrow clamps, I just slid down the original clamps out of the way in the picture. If it was going to work, it would work with the narrow clamps. No work...
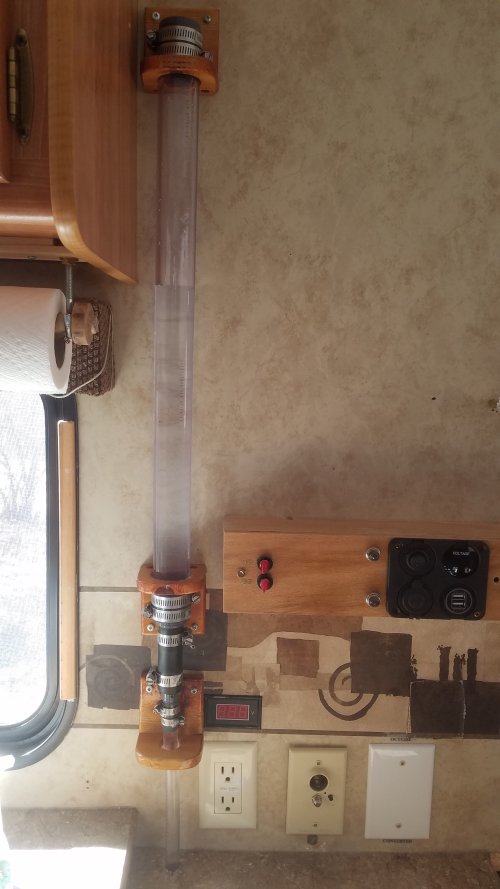
So now, the issue is more than esthetics.

I had already prepared a solution before I began construction, just in case it did not work. I have a black, possibly rubber, section that is the required 3/4 inch ID. One end, the top end, of the rubber will fit the 3/4 barb. The other end, bottom end, will fit a 3/4 barb to 1/2 barb.


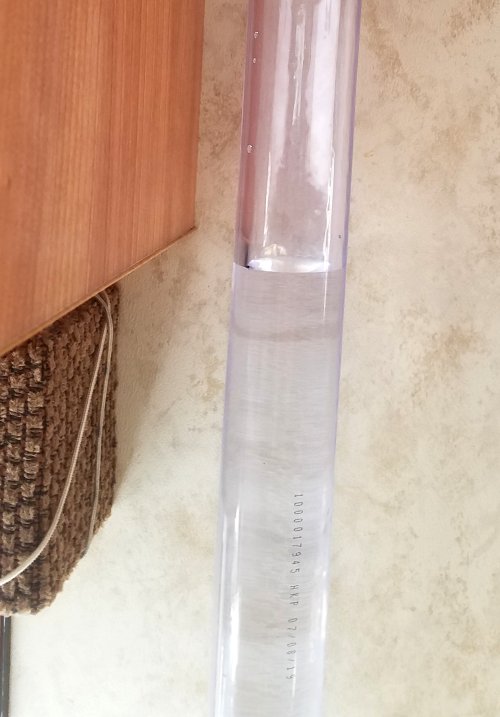
AccumView20191125_110955.jpg, 59kB After the install...


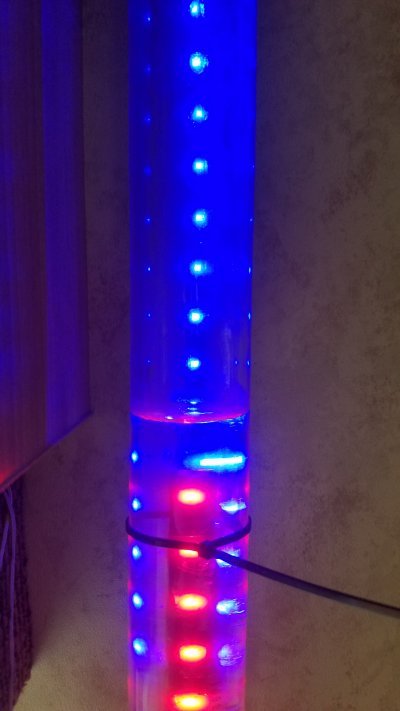
AccumViewLine20191125.jpg, 50kB The water line is surprisingly easy to see.
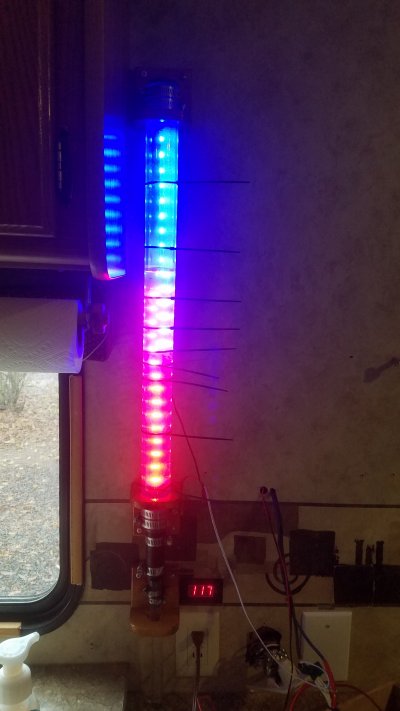

AccumLED20191204_145738.jpg, 38kB AccumLEDs20191204_145811.jpg, 33kB
Glueing the LED strips to the back side with Vinyl Adhesive Chauk.
Tie wraps are used all along the structure.
The LEDs are too bright.
The LEDs are powered from two independent power sources:
One is the Reject Power or Overflow Power, and it is regulated to 12.0 volts.
The other Coach Low Voltage DC Power, and it is also regulated to 12.02 volts.


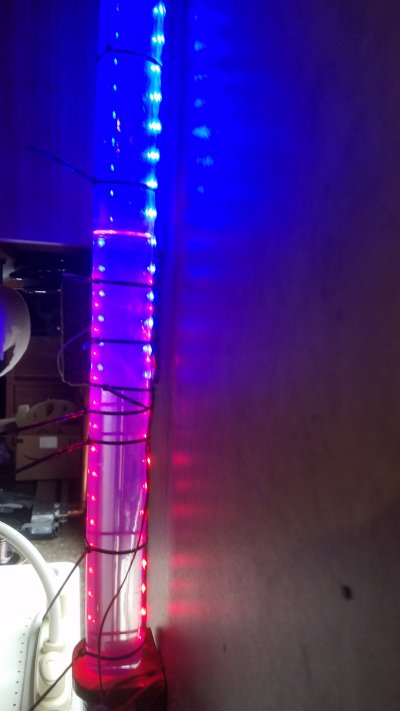
AccumLEDs20191205_103634.jpg, 39kB The LEDs were too bright, almost blinding during the temporary test. Actually, they are only too bright at night. The night power is from the Coach DC Power. So I installed a 100 ohm pot, a 50 ohm would have been better, to adjust the brightness to any value. The pot is contained in the box to the right. I may make the adjustment accessable if it works OK. One small problem is that with the pot the blue LEDs dim and go out before the RED. So the Red LEDs are a little too bright, and the Blue a little too dim during the night.

Also, I don't think that I like the overlap of LEDs in the center. I believe there is a way to take a pair of sizzers and trim the length.

Also, note that you can see the water line. The band is lit red. It really shows up in the previous picture with the tie wraps.


Got to get this thing finished...
Then I can take the RV to the ocean or a lake to really check it out. This kind of thing can not be checked out anywhere near home.


The best reason to paint is that there is no reason to paint.
Keith Haring


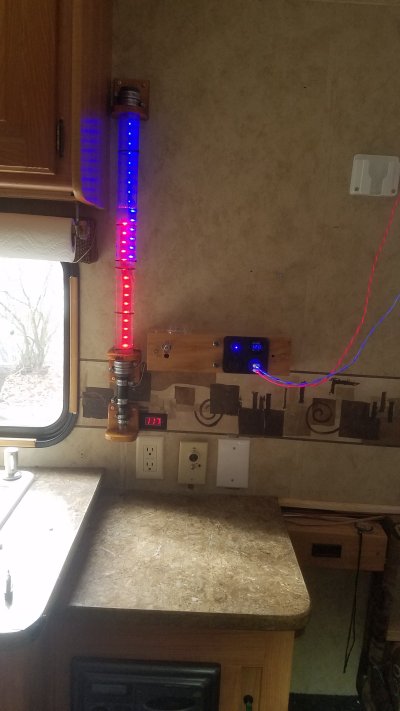
AccumNew20191206_094955.jpg, 32kB Removed the blue LED strip from the back of the tube, and instead placed it on the wall. Now both strips can be straight. I like this better...
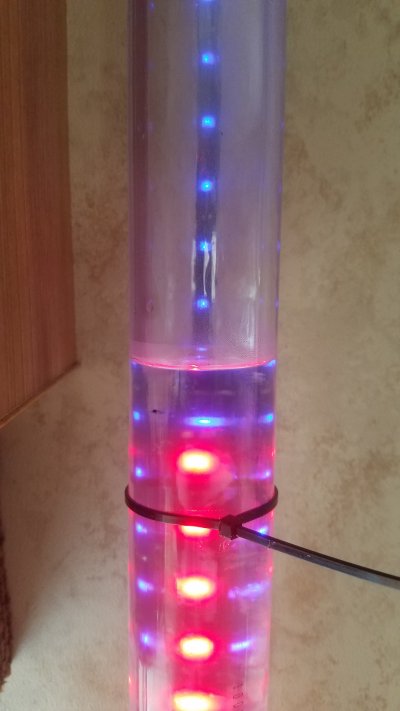


AccumRej20191206_095038.jpg, 33kB Toggled the switch to "night mode" which has the power from the Coach DC Supply. The power is further reduced with an adjustable pot. The pot is adjusted for the blue LEDs to be almost out. The best viewing of the water line is without any lights, as you can see. But this is not bad; A second best.


RULERBOW