index


|
|
RV Maintenance
Thermal Efficiency
|
|
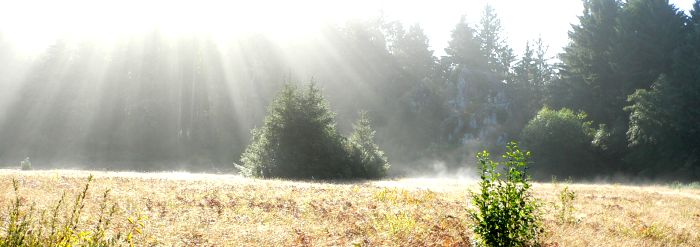
Patricks Point State Park
I took this picture at Patricks Point while we were safe, dry, and warm in our RV.
|
Now this is RVing; When you can look out and see this!
But, you need to know what the insulation in your walls is doing,
and what your furnace is doing. And other things too.
This exercise is to determine the R-value of the RV as a whole.
I must know the "stock" R-value from the dealer before I begin to make insulation changes.

The setup...
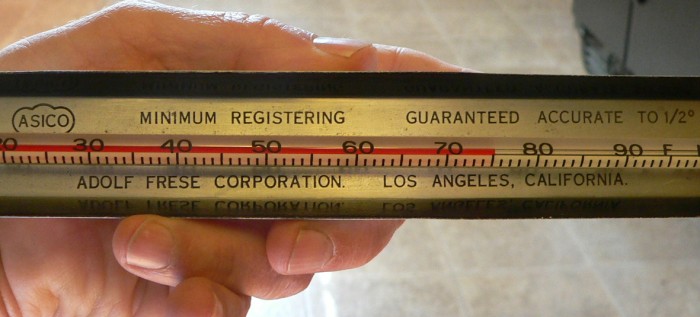
Here is my "calibration" thermometer, and I use it for all the following measurements.
For a mechanical, it is fast and easy to read.
I love and rely on my old antique thermometer.
It is an alcoholic thermometer as you can see by the red color.
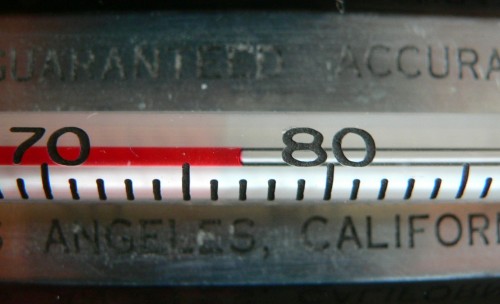
The alcohol line forms a bottom cusp, and a resulting curve that is concave up, indicating vanderwall attraction,
as is the case with alcohol and glass. Alcohol "wets" the sides of the glass and climbs up.
This is to say that the internal forces of cohesion of Alcohol are less strong
than the external adhesive forces to glass.
Mercury, on the other hand, sticks to itself more than glass, forming the opposite curve: a convex line.
You always read at the cusp wether it is up or down. In this example: 76.9F degrees.
They do not make good thermometers anymore. On the "modern" ones,
you have to look slightly to the left of center to see the graduations, and look in another position to see the column.
Thank you Dad, for leaving me one of these...
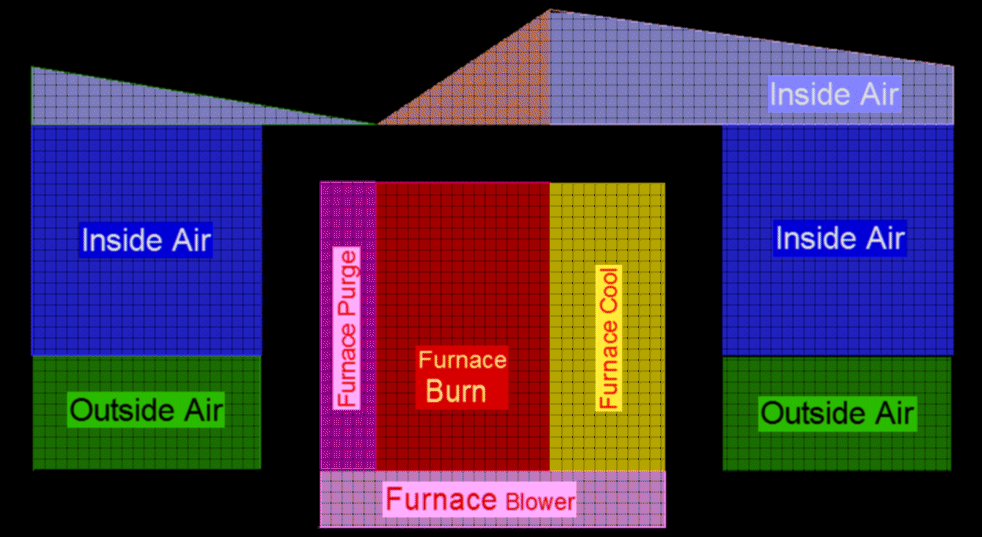 This may be a kind of a dumb way to diagram the operation of the heater.
Fluctuating Inside air temperature is at the top, and heater operation is at the center.
The portion of inside air that is not fluctuating, in blue, is 66 degrees.
Outside air, in green, at the bottom, is constant at 29F degrees.
At the top, on the left in grey color shows the inside RV temperature as decreasing.
In the center section, on the left, in purple, is the heater coming on, but only the Purge Cycle. There is no flame.
Temperature, at the top in grey, continues to decay.
In the center, in red, the heater comes on with flame as a Burn.
The RV inside air, at the top in brown, begins to rise. It rises 6 degrees.
In the center, in yellow, the heater turns off the flame, and inters a Cool Down Mode.
The blower continues to run to scavenge any remaining heat.
The inside air is mixed somewhat due to the blower action, but begins to drop in temperature.
I have drawn the temperature decay as a straight line out of artistic convenience.
I have a huge panoramic picture window on the back end of the RV at the dinette.
It is beautiful. That big window is one reason why we bought it,
but it carries a large heat liability.
To compensate for all the glass, I have Pleated Fabric Shades on all windows except two.
I have modified the top Valances and extended side Jambs for less clearance.
Great R-values in the walls, or anywhere else, are useless,
and will have little effect on the R-value of the RV as a whole unless you address the window issue.
The Keystone is a cheap RV. Despite all the cheap construction,
it does have a good, entirely enclosed underbelly, with fiberglass insulation, and simi inclosed fresh water holding tank.
Keystone claims R-7 sidewalls, R-11 roof, and a R11 floor insulation.
In addition, I have started modified the RV with radiation reflecting bubble mylar,
styrofoam board, and carpet under cabinets and in the holds.
But this page is more about measuring, and being able to see the progress...

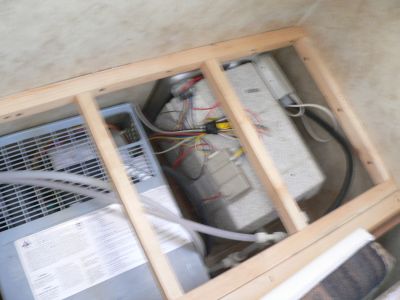
Air Furnace on left, Water heater on right.
|
Here are some recorded measurements.
During this run, one window was cracked about one inch open for ventilation.
During this time, there was frost on the ground with humidity high, and it was just getting light,
Outside temperature was 27F degrees, climbing to 30F degrees.
I recorded when the heater came on or off.
The Time, Inside Temperature, The duration, Outside Temperature, Decay Temperature.
6:53 off                      27F
7:07 Onn  66.1F  (14Min off)  28F
7:13 Off  72.3F  ( 6Min onn)  28F
7:27 Onn  66.3F  (14Min off)  28F  Decay 6.0F
7:33 Off  72.0F  ( 6Min onn)  29F
7:47 Onn  65.9F  (14Min off)  29F  Decay 6.1F
7:54 Off  72.2F  ( 7Min onn)  30F
8:09 Onn  66.0F  (15Min off)  30F  Decay 6.2F
8:15 Off  72.6F  ( 6Min onn)  30F
 Furnace Ran 3 times in 0.933 hrs. Each cycle lasts 0.311 hours.
 The off-time is, on average, 14 minutes.
 The on-time is, on average, 6 minutes.
And there are a couple of timed functions that also have nothing to do with outside or inside temperatures:
 90 seconds out of every on-time is devoted to cool-down.
Reclaiming and scavenging residual heat from the "burn".
 22 seconds out of every on-time cycle is devoted to pre-run, (15s Purge and 7s ignition).
Initially, old air must be purged out to prevent explosions.
90 seconds plus 22 seconds is 1.9 minutes.
Total cool down is 14 minutes plus 1.9 minutes is 15.9 minutes.
 Therefor the on-time, "burn time", for heat production,
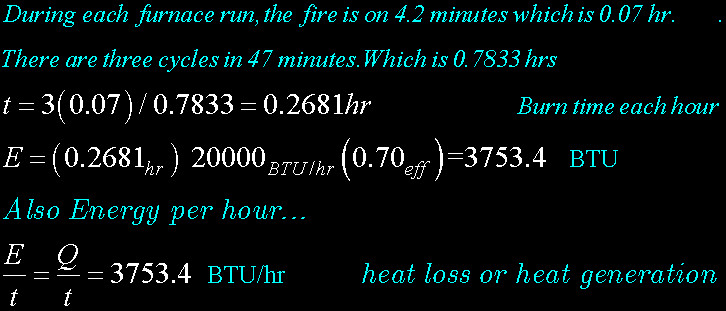
out of the measured 6 minutes, is 4.2 minutes, 0.07 hr.
Total burn time is 0.07*3/.933 = 0.225 hr.
(For battery usage, it is the full 6 minutes.)
So for any group of hours during the day...
Battery Duty cycle = 6/(14+6) = 0.30 Onn/time
Propane Duty cycle = 4.2/(14+6) = 0.21 Onn/time
Summation of 12.6 minutes per hour of burn
Summation of Rest periods is 47.4 minutes per hour.
So for an outside temperature of 28F degrees,
the heat is on not quite a quarter of the time to maintain a steady state
inside temperature.
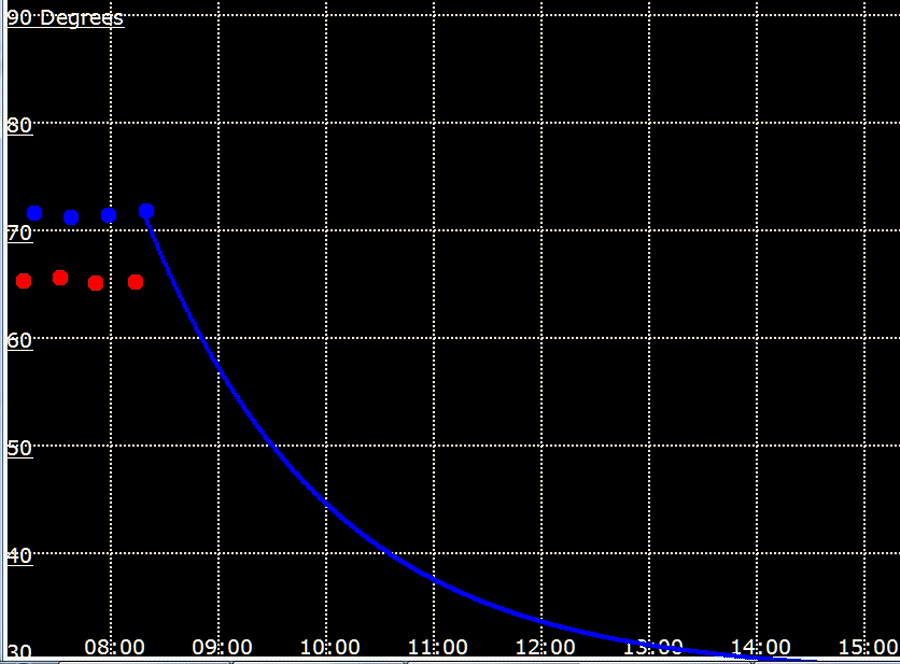
The red dot points are when the Furnace came on.
The blue dot points are when the Furnace turned off.
As you can see, my RV is not insulated good enough; I would be freezing by nightfall,
not to mention water lines.

 This is how you are to build it:
The ark is to be three hundred cubits long, fifty cubits wide and thirty cubits high.
Genesis 6:15
|
RV Interior Living dimensions: Width=8.0ft, Height=6ft 8in, Length=17.0ft
Surface area is two end walls, two side walls, and a celling and floor.
Surface area = 2(8ftx6.66ft)+2(17ftx6.66ft)+2(8ftx17ft)= 605sqft
Average inside temperature is aprox 69F degrees
Outside temperature is aprox 29F degrees
Average 40F degree difference between outside and inside, (steady state).
My RV will have an average R-Value:
Furnaces are rated for input BTU.

 Manufacturer document has 76% efficient.
|
Efficiency:
There are some furnaces at 75%, and some at 95%.
Your furnace will be in between somewhere.
According to this sticker, mine is 76%.
Mine is rock bottom, and evidently, outside wildlife enjoy and share it's use too.
And that explains why the wildlife like to huddle up against my RV more than my neighbors RVs.

Steady-State Method
Definition Method
Steady-State condition:
The delta Temperature is 40F degrees (nearly steady state).
This method requires the temperature deference to be constant.
This determination of R-Factor was almost by simple Definition.
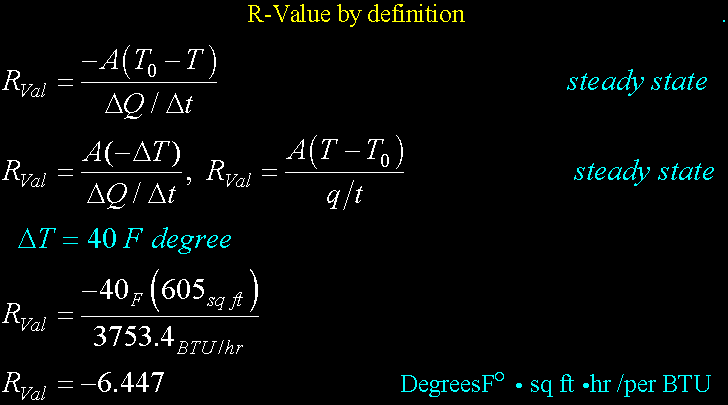
R-Factor is 6.447
R=6.447
The above determination of the R-Value was by direct measurement.
"A steady state condition of a set amount of energy input, and a set temperature difference
between inside and outside."
(Actually, the inside temperature is zig zagging between 72F and 66F, but it has a steady state workable average.)
This empirical measurement is for the whole RV in one go.
Or...

Theoretical Itemized Materials and Construction Method
There is another way...
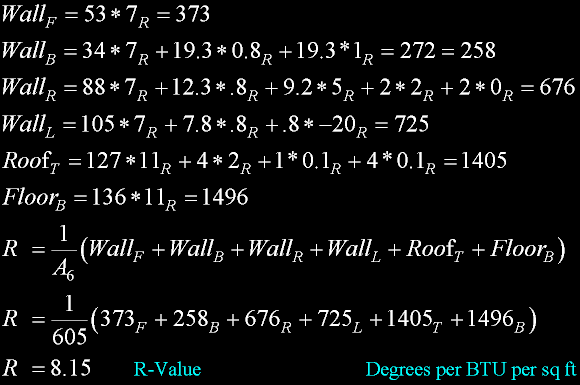
You can take the average of all the specific R-Values of all the construction materials:
(For example, Springdale claims it has R-7 Sidewall, R-11 Roof, R-11 Floor Insulation)
I will call this the itemized method.
 Front EndWall is 8.0ft by 6.66ft = 53.3sqft
Front EndWall (no windows) is 53sqft at RVal=7.

 Back EndWall 34sq ft at RVal=7
Glass 19.3 sqft at RVal=0.8, and 19.3sqft of Pleated Blinds at RVal=1.

 Right Wall is 6.66ft by 17.0ft=113sqft
Right Wall is 88.8 sqft at RVal=7
Glass 12.3sqft at RVal=0.8
Door 9.2sqft at RVal=5, Plastic 2sqft at RVal=2, Al Frame 1 sqft RVal=0
Right Wall contains a door 25.5 in wide, 69in high, 1 in thick styrofoam with plastic window
and 1 inch aluminum frame with direct exposure to inside.

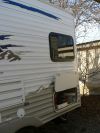 Left Wall is 105 sqft at RVal=7
Glass, two windows, 7.8 sqft at RVal=0.8
Refrigerator
Open window 0.5 inches: 0.8sqft at RVal=-20
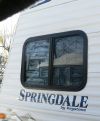
 Roof is 8.0ft by 17.0ft=136sqft
Roof is 127sqft at RVal=11
SkyLights 4 sqft at RVal=2
BathRoom Vent 1 sqft at RVal=.1
AirConditioner 4 sqft at RVal=.1
AirConditioner was not layered with insulation yet. Also room air was leaking into roof compartment
 Floor is 8.0ft by 17.0ft=136sqft
Floor is 136 sqft at RVal=11
Add up every glass window, Air Conditioning on the roof, Plastic Roof vents, styrofoam metal door, etc.
A6 is simply the RV skin area. All six surface areas: four sides and a roof and a floor.
The specific estimates are from Keystone.
R=8.15
The Itemized Measurement Method falls short of the materials used, and also the claims of Keystone.
There was poor construction with an unfinished section under the bathtub. Outside air was interring here.
Keystones claims of fiberglass insulation in the walls and roof does not include the studs and rafters.
A theoretical R-Val estimate from constituent parts must be inflated by Keystone, in part due to poor workmanship.
An actual measurement should show less than R=8.15.
And it does!

Simple Entropy Decay
(during rest)
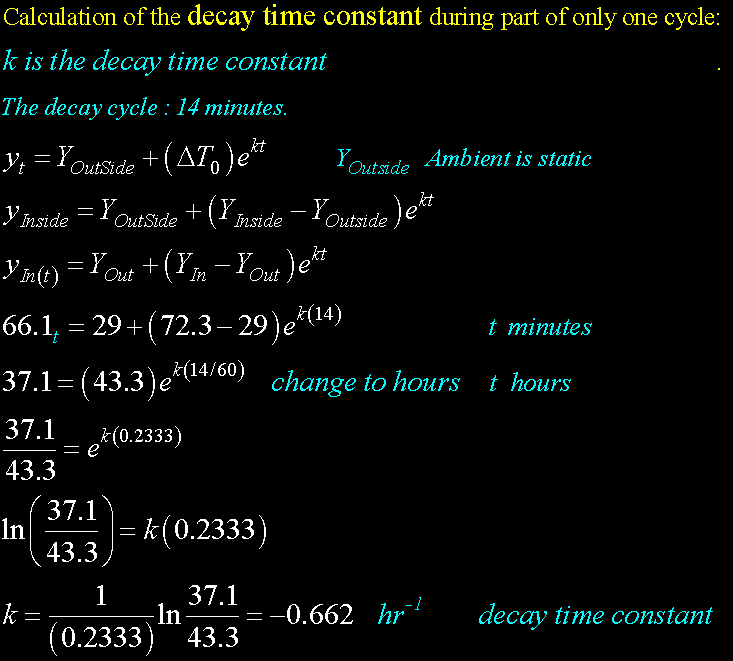
There is another approach: By looking only at the temperature decay during the 14 minutes.
We are only looking at a part of one cycle: the decay cycle.
This approach concerns Entropy and the natural process of energy dispersal.
I have already derived this equation elsewhere.
 Heat Entropy
So now, I just present it here again as evident and previously established.
 Initial Inside temperature starts out at 72.3Fdegrees,
 And decays to 66.1F degrees
 in (14) t minutes.
 Static Outside temperature is aprox 29F degrees,
Knowing k, we now have a complete formula for calculating how long to wait for any temperature.
Note the k turns out to be negative, meaning a decline.
 And note there is agreement of this -0.662 Decay
 to the -0.6447 Steady State Heating.

Entropy Decay as a percent
But wait...
There is a simplification of interpretation.
There is a bankers equation for calculating compound interest, compounded continuously.
I remember the equation has the same form as Entropy: e raised to a product of rate and time.
What is interesting is that r, or interest rate, is a percentage.
And r in the bankers equation is in the place of k in Entropy equation.
Therefor, k may be interpreted as an "efficiency of heat transfer" expressed in a proportion or percent.
We may be able to simply negate and change the sign of k to obtain R.
In the bankers equation r is >0 and the P(t) grows.
In the Entropy equation r is <0 and the P(t) decays.
Wouldn't it be interesting if the Entropy Decay coefficient k is like the Interest Rate r? And is really a Factor, expressable as a convenient percent?
Interest rates are really simple!
OK, I will pursue this.
With total disregard of the 605 square feet surface area.
With total disregard of the 40 degree drop.
K will have to be negative.
K is -0.662 from the equation.
In this analogy, k is like a heat transconductance, expressed as a ratio, or part, or factor, expressable as a percent.
If true, every hour the heat decays -66.2%. Which calculates out as 51.3F degrees in the first hour.
Or, for a further check using 14 minutes, or 0.233Hr
(-0.662*0.233) = (-15.4%), Temp = -15%(72.3-29)= -6.49 degrees, 72.3-6.49 = 65.8, aprox= to the 66.1. That is of course correct.
Every hour the heat decays -66.2% of the remaining heat.
The analogy to interest rates expressed as a percent works also for heat.
I can get my head around that very easily.

I suppose k could also be equated to R-val...
I was thinking k can only depend on Surface Area A, Initial stored heat Q, and Temperature Diff.
There is nothing else in there!
Probably, k=AT/(QR).
From looking at the dimensions, it looks possible.
The dimensionality of this "RValue" k is 1/t, the same as r or k.
And when any of these are multiplied times t, the expression is dimensionless: a true "TimeConstant"
It is facinating to think that an insulation value Rval can be expressed as a single exponent.
Looks possible. Call it k or R or Rval.
Will have to change one thing. Rval is a Thermal Resistance.
The "r" is a Thermal conductance percent. Also a negative, or a loss.
Therefor Rval as a Resistance needs to be inverted.
The reciprocal of r = 1/Rval
The reciprocal of r in e^-rt is e^-(1/Rval)t
This will produce the same decay curve.
Does Rval = 1.94? No!
Does not work!
Rval should be around 6, 7 or 8.
14 minutes is not enough time. An air burst of hot air around the temperature sensor does not reflect the true room, or inside temperature.

"If lessons are learned in defeat... our team is getting a great education."
- Murray Warmath / Minnesota
|
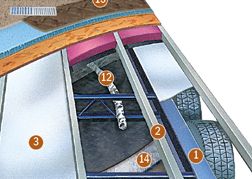 There may be a "heated belly"!
Two ducted heat sources!
But, I am not sure if this hose exists in my Springdale.
You might check yours.
#12 is a separate heat outlet for heating the underbelly.
#12 is a 3inch hose.
And yes! When I stick my hand down under the floor above the fiberglass, there IS extra heat.
I did not count on this sneaky stuff.
#3 is the rigid heating ductwork of which my calculations are already familiar.
I like the concept of #12 because the 5/8 flooring is going to retain
a lot of heat. Instead of the concept of the wood flooring as an added insulation, I would
rather have it as a source of specific heat.
But, then again, I would have to insulate the frame. Can not do that. Thinking...

Air Heater
Consumption
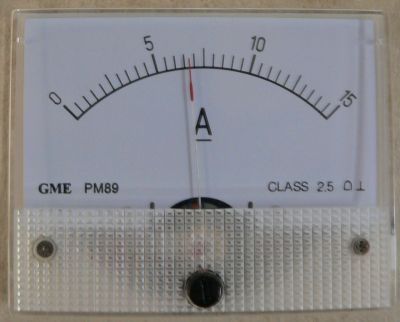 Batteries:
From the same data as above:
The heater came on approximately 3 times an hour at 6 minutes each.
That is a duty cycle of 0.3: a third of the time.
18 minutes out of every hour.
Battery consumption = 18min * 7.5Amps = 2.25 Amp/Hr
Expected life on one 100 Amp/hr battery:
100/2.25 = 44 hours, not quite two days.
Actually, less than that, as Lead Acids are not to be brought down less than 50%.
Therefore, one battery without replenishment, will not make it through the second night at 28F degrees outside.
(With good sunshine there are no electrical restrictions, and the gap from day to day is easily bridged.)
LPG Propane:
20,000 BTU/Hr Air Furnace consumption
Two 7 gal tanks, 30lbs of gas
1 gal has 91,502 Btu, 21622 btu per pound
640,514 BTU per tank
640000/20000=32Hr with Furnace continually on
Worst case scenario is 28F degrees continuously day after day.
Duty Cycle=.21: Life=120Hr, aprox 5 days per tank at 28F degrees outside.
With any kind of sunshine through the windows,
this should go to a nice round figure of 7 days/tank: One week
But that does not include hot water or cooking.
Along the coast for a week of boondocking, with temperatures around 50F degrees,
we use at most a half tank. This is with pleasant and normal usage,
and one tank per week would be the extreme.

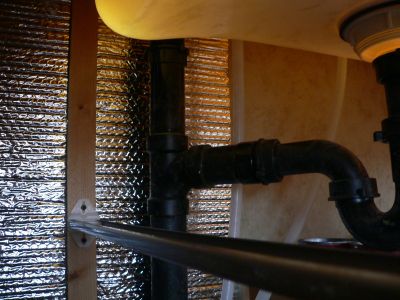 Under the kitchen sink. The under side of sink is a fascinating yellow translucent with sun exposure on top.
|
Seems to me it is more efficient to heat "things" in the RV than to use the same "things" as insulators.
Do not use the inside partition walls to insulate; instead, use them to store energy.
Do not go directly to heating the air, but instead heat intermediary things such as
the bath tub, commode, metal stove, canned goods, wooden barriers, and kitchen sink.
They can be heat reservoirs. Ultimately, the air will still be heated, which was the
final direct result anyway; it just takes longer. The ultimate fate of the heat is unavoidable.
However, To get the same outside wall insulation, I added some reflective insulation
in inconspicuous places, like under the sinks. Because with the original scenario,
the inside wall partitions did offer
some indirect insulation, such as when closing the bathroom door and shutting cupboards. Primarily, the function of the outside walls as insulation remains the same.
Thermal Heat Capacity
Specific enthalpy
Specific heats:
Copper     0.39 KJ/C/Kg 25 ft service cord, The cord is massive and compensates for its low Specif Heat.
Fiberboard 2.2  KJ/C/Kg Bed supports, Storage walls.
Glass      0.84 KJ/C/Kg Dishes in pantry
Steel      0.49 KJ/C/Kg metal Stove, metal PowerCharger
Paper      1.3  KJ/C/Kg Magazine storage
Wood, oak  2.0  KJ/C/Kg Some cosmetic parts of walls
Wood, pine 2.5  KJ/C/Kg Some inside partition walls
Water           KJ/C/Kg Canned goods, bottled water
Run Drier hose from central air duct to under the stove.
The hole through the floor under the stove is not visible.
From there the air goes to inside cabinetry for all canned goods and kitchen sink.
Also, water distribution lines are at a hub for right side of trailer.
Run Drier hose from central air duct to under the bath tub.
The flooring hole under the bath tub is not visible.
From there the air goes to bathroom area, under bathroom sink, water pump,
water lines, Charging center, and
finally up through a clothes closet.
Also water distribution hub for left side of trailer.
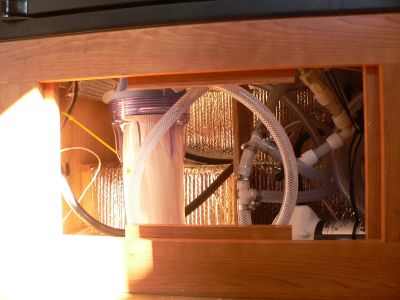
 Finished insulating the two areas that hold water lines, pump, and filter with Reflectix.
The refrigerator sits above these two areas on half inch ply. I installed insulation on the top of both areas.
The high ridge in the back is from the wheel finders. It is made of steel with a carpet covering.
I insulated this too. The back wall is hard board with RVal-5 fiberglass behind.
I installed carpet then reflective insulation over that too.
All outside surfaces have better insulation now. The left and right compartments do not go to the outside, so
no insulation is necessary. In fact, intercompartment wood holds heat. It is a good thing!
This wood can be used as a reservor of heat energy, With warm wood around, it will take longer for the lines to freeze.
In addition, I drilled large holes between all inner compartments so that heat will be distributed. To the right,
is an unseen compartment that is under the bathtub. I directed heat from the flooring to come up into this compartment.
Heat flows from the bathtub compartment through holes into the water pump compartment which, as you can see, also has a lot of water lines
and a water filter. The water pump compartment generates it's own heat, but access to furnace heat also helps. There are
also holes to the left into the next compartment which is a power supply compartment.

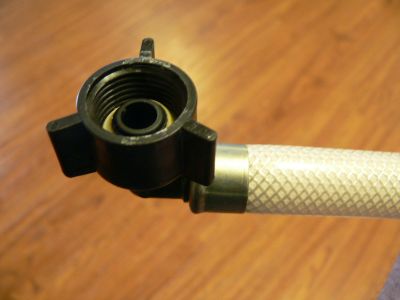 All - every single one - of these factory hoses had to be replaced. They all either had an occasional drip to massive leaks.
Factory crimps do not stay tight. But these lines can be repaired:
HackSaw the band at an angle. Then hacksaw radially at the bulge ring. Remove as much of the band as possible.
Then apply a new adjustable band. But the other end will eventually leak too. Better to just replace the whole thing with
vinal and then you are done forever.
The replacement ends are not "finger-tights" as these factory hoses. They require some real torque, but never leak.
However, I have never checked vinal for "drinking water safe".
 I started using Reflectix when I found it in Osh. And cheap. AT 2 ft wide, it runs about a buck a foot.
5/16 inch thick, and reflective both sides.
It has an RVal of 1.1 for thermal conductance, and a radiant RVal anywhere from about 2 to a whopping 20,
depending on clear air
space on the reflecting side, and on wave length of the heat.
For example at room temperature and at a half inch clear, the RVal is 2.7.
A 0.75 inch free air space above the reflecting side, the RVal is 3.8. If you have many inches, the RVal
can be 20.
That stuff is for me!
In some tight spaces, I am not able to exploit the stuff to its full potential.
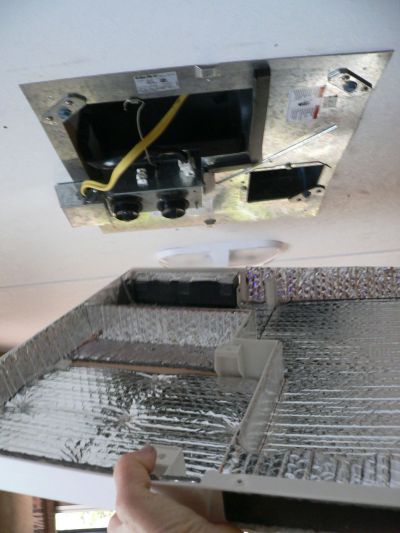
And in one application, for the air conditioner,
I have the heat going in the wrong direction. I have the reflecting surface facing up, and heat is not allowed into the RV.
Instead, I would prefer to have room heat reflected back down and conserved.
And heat loss increases linearly with temperature. So, high up near the ceiling the temperature is hottest.
That is where there is the greater tendency for heat loss.
That is true for contact transmission. And it is even worse for Radiation: it is to the fouth power!
Gotta keep the ceiling insulated.
The product can even work both ways (both sides), but I could
not see a practical way, and still have the air conditioner functional and workable.
I have never really used this new air conditioner. Perhaps I should just block it off.
I plan to never use this air conditioner.
I have used it only once, and that was only because the dealer gave me
a free night at a Redding park, where the temperature was over a hundred degrees.
I don't know about the RV, but I was not designed to be in Redding California.
The air conditioner works good, and it should!
It is as a new unit, but I will never use it. It is just a big old wind resistance
when going down the road, and an avenue for cold when resting on the coast.
And these two facts make it look bad, wether going down the road or not.
Anyway, too bad the reflecting side is facing up. This will do temporarily until I can get rid of it.
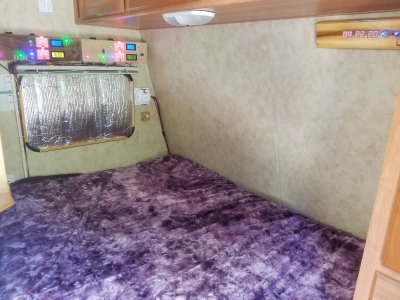 On the windows...
Better to use reflecting styrofoam instead of Reflectix. But here in the bedroom, I like to bend the window insert to see out. I like to also bend the panel for fresh air.
So this window insert is mostly made of reflectix.
Reflective side in, retains heat inside.
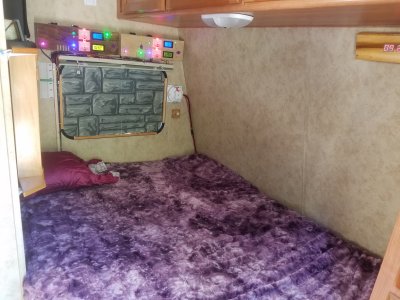 Reflective side out, keeps inside cool.
Any decorative coating can be glued to one side. However, flat black is the best.
All my other windows use flat black. There are two reasons for flat black:
From an engineering standpoint, flat black absorbs the most heat, and that is what you want.
From an esthetics standpoint, the police, and property owners do not like to see RVs with shiny reflectix cobbled up in the windows. It looks bad.
Instead, for pleasant relations while stealth camping, use flat black; as it is hard to see behind glass.


 This may be a kind of a dumb way to diagram the operation of the heater.
Fluctuating Inside air temperature is at the top, and heater operation is at the center.
The portion of inside air that is not fluctuating, in blue, is 66 degrees.
Outside air, in green, at the bottom, is constant at 29F degrees.

 Manufacturer document has 76% efficient.



 There may be a "heated belly"!
 All - every single one - of these factory hoses had to be replaced. They all either had an occasional drip to massive leaks.
Factory crimps do not stay tight. But these lines can be repaired:
 On the windows...
 Reflective side out, keeps inside cool.